
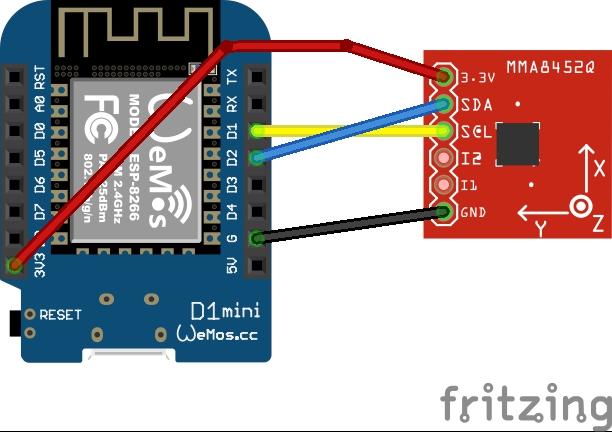
In this example we will connect a MMA8452Q accelerometer to an ESP8266 – as usual it’s a Wemos Mini
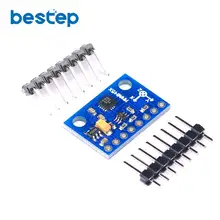
Lets look at the sensor
The MMA8452Q is a smart, low-power, three-axis, capacitive, micromachined accelerometer with 12 bits of resolution. This accelerometer is packed with embedded functions with flexible user programmable options, configurable to two interrupt pins. Embedded interrupt functions allow for overall power savings relieving the host processor from continuously polling data.
The MMA8452Q has user selectable full scales of ±2 g/±4 g/±8 g with high-pass filtered data as well as non-filtered data available real-time. The device can be configured to generate inertial wakeup interrupt signals from any combination of the configurable embedded functions allowing the MMA8452Q to monitor events and remain in a low-power mode during periods of inactivity
Connection
Here is a layout, its an easy device to connect
Parts List
Here are the parts I used
| Name | Links | |
| Wemos Mini | ||
| MMA8452 | ||
| Connecting cables |
Code
This example does not require any libraries
// Distributed with a free-will license.
// Use it any way you want, profit or free, provided it fits in the licenses of its associated works.
// MMA8452Q
// This code is designed to work with the MMA8452Q_I2CS I2C Mini Module available from ControlEverything.com.
// https://www.controleverything.com/content/Accelorometer?sku=MMA8452Q_I2CS#tabs-0-product_tabset-2

#include <Wire.h>

// MMA8452Q I2C address is 0x1C(28)
#define Addr 0x1C

void setup()
{
  // Initialise I2C communication as MASTER
  Wire.begin();
  // Initialise Serial Communication, set baud rate = 9600
  Serial.begin(9600);

  // Start I2C Transmission
  Wire.beginTransmission(Addr);
  // Select control register
  Wire.write(0x2A);
  // StandBy mode
  Wire.write((byte)0x00);
  // Stop I2C Transmission
  Wire.endTransmission();

  // Start I2C Transmission
  Wire.beginTransmission(Addr);
  // Select control register
  Wire.write(0x2A);
  // Active mode
  Wire.write(0x01);
  // Stop I2C Transmission
  Wire.endTransmission();

  // Start I2C Transmission
  Wire.beginTransmission(Addr);
  // Select control register
  Wire.write(0x0E);
  // Set range to +/- 2g
  Wire.write((byte)0x00);
  // Stop I2C Transmission
  Wire.endTransmission();
  delay(300);
}

void loop()
{
  unsigned int data[7];

  // Request 7 bytes of data
  Wire.requestFrom(Addr, 7);

  // Read 7 bytes of data
  // staus, xAccl lsb, xAccl msb, yAccl lsb, yAccl msb, zAccl lsb, zAccl msb
  if(Wire.available() == 7)
  {
    data[0] = Wire.read();
    data[1] = Wire.read();
    data[2] = Wire.read();
    data[3] = Wire.read();
    data[4] = Wire.read();
    data[5] = Wire.read();
    data[6] = Wire.read();
  }

  // Convert the data to 12-bits
  int xAccl = ((data[1] * 256) + data[2]) / 16;
  if (xAccl > 2047)
  {
    xAccl -= 4096;
  }

  int yAccl = ((data[3] * 256) + data[4]) / 16;
  if (yAccl > 2047)
  {
    yAccl -= 4096;
  }

  int zAccl = ((data[5] * 256) + data[6]) / 16;
  if (zAccl > 2047)
  {
    zAccl -= 4096;
  }

  // Output data to serial monitor
  Serial.print("Acceleration in X-Axis : ");
  Serial.println(xAccl);
  Serial.print("Acceleration in Y-Axis : ");
  Serial.println(yAccl);
  Serial.print("Acceleration in Z-Axis : ");
  Serial.println(zAccl);
  delay(500);
}
Output
Open the serial monitor – this is what you should expect to see
Acceleration in X-Axis : 2047
Acceleration in Y-Axis : 1470
Acceleration in Z-Axis : 2047
Acceleration in X-Axis : 856
Acceleration in Y-Axis : -15
Acceleration in Z-Axis : -763
Acceleration in X-Axis : 181
Acceleration in Y-Axis : 1165
Acceleration in Z-Axis : 912
Acceleration in X-Axis : 297
Acceleration in Y-Axis : -589
Acceleration in Z-Axis : -554
Links
https://www.nxp.com/docs/en/data-sheet/MMA8452Q.pdf
