
In this article we look at a temperature sensor, the STTS22H sensor from ST and connect it to an ESP8266 board
Sensor Information
The STTS22H is an ultralow-power, high-accuracy, digital temperature sensor offering high performance over the entire operating temperature range.
The STTS22H Temperature Sensor is an ultralow-power, high-accuracy, digital temperature sensor from ST Microelectronics and is housed in our standard Qwiic form factor. Thanks to its factory calibration the STTS22H offers high-end accuracy performance over the entire operating temperature range, reaching as low as ±0.5°C without requiring any further calibration at the application level.
The sensor operating mode is user-configurable and allows selecting between different ODRs (down to 1Hz) or the one-shot mode for battery saving. In one-shot mode, the sensor current consumption falls to 1.75µA.
Peripheral addresses are also user-configurable and allow up to four different addresses to be specified by manipulating the jumpers on the back of the breakout. In addition, an interrupt pin is available to signal the application whenever the user-selectable high or low threshold has been exceeded.
Features
- Uses I2C interface (Qwiic-enabled)
- Four selectable addresses
- 0x3C (default), 0x3E, 0x38, 0x3F
- Operating temperature: -40°C to +125°C
- Temperature accuracy (max): ± 0.5°C (-10°C to +60°C)
- Operating voltage: 1.5V to 3.6V
- Typically 3.3V if using the Qwiic cable
- Ultralow current: 1.75µA in one-shot mode
- Programmable thresholds with interrupt pin
- Programmable operating modes
- Freerun, one-shot, and Low-ODR
- NIST traceability
Parts List
Here are the parts I used
| Name | Links | |
| Wemos Mini | ||
| STTS22H | ||
| Connecting cables |
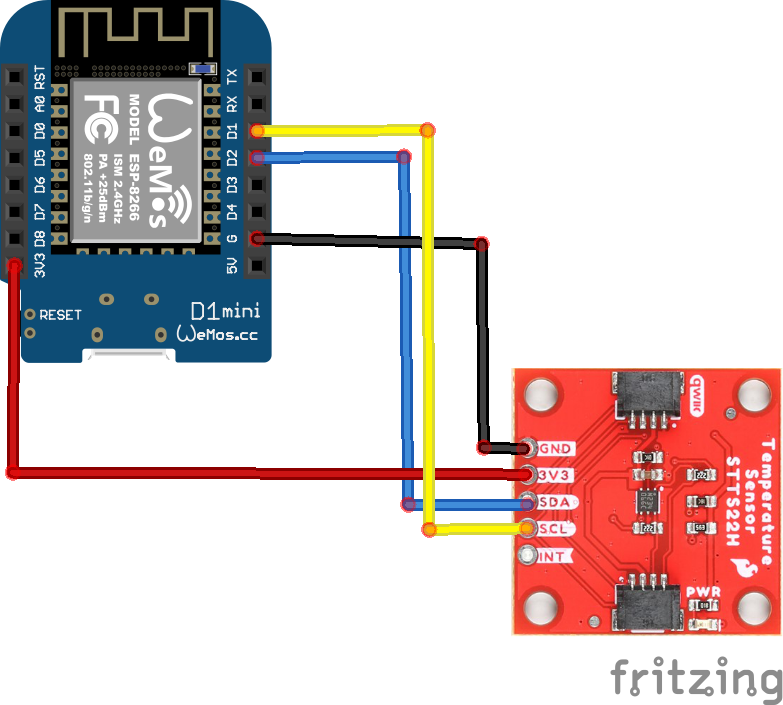
Schematic/Connection
I used 3.3v from the ESP32 board
I also used a Qwiic cable, but if you do not have one, there is an unpopulated set of pins you can solder a header to. This is how you would wire this up
Code Example
I installed the Sparkfun library using the Arduino ide
Click the Manage Libraries … menu item, search for STTS22H, and select the Sparkfun STTS22H library like this
This is one of the examples that gets installed with the library, with a few comments and unused lines removed.
#include <Wire.h>
#include "SparkFun_STTS22H.h"

SparkFun_STTS22H mySTTS;

float temp;

void setup()
{

    Wire.begin();

    Serial.begin(115200);

    if( !mySTTS.begin() )
    {
        Serial.println("Did not begin.");
        while(1);
    }

    Serial.println("Ready");

    // Other output data rates can be found in the description
    // above. To change the ODR or mode, the device must first be
    // powered down.
    mySTTS.setDataRate(STTS22H_POWER_DOWN);
    delay(10);
    mySTTS.setDataRate(STTS22H_1Hz);

    // Enables incrementing register behavior for the IC.
    // It is not enabled by default as the datsheet states and
    // is vital for reading the two temperature registers.
    mySTTS.enableAutoIncrement();

    delay(100);
}

void loop()
{

    // Only use data ready for one-shot mode or 1Hz output.
    if( mySTTS.dataReady() )
    {
        // Temperature in different units can be retrieved
        // using the following functions.
        //mySTTS.getTemperatureC(&temp);
        mySTTS.getTemperatureK(&temp);
        Serial.print("Temp: ");
        Serial.print(temp);
        Serial.println("F");
    }
    delay(1000);

}
Output
When run you will see something like this in the serial monitor window
Temp: 71.60F
Temp: 71.60F
Temp: 71.62F
Temp: 71.60F
