
In this article we look at a DPS310 barometric pressure sensor and we will connect it to a Wemos Mini
First lets look at the sensor
The pressure sensor element is based on a capacitive sensing principle which guarantees high precision during temperature changes. The small package makes the DPS310 ideal for mobile applications and wearable devices.The internal signal processor converts the output from the pressure and temperature sensor elements to 24 bit results.
Each unit is individually calibrated, the calibration coefficients calculated during this process are stored in the calibration registers. The coefficients are used in the application to convert the measurement results to high accuracy pressure and temperature values.
The result FIFO can store up to 32 measurement results, allowing for a reduced host processor polling rate. Sensor measurements and calibration coefficients are available through the serial I2C or SPI interface.
The measurement status is indicated by status bits or interrupts on the SDO pin.
Here is the sensor I purchased from the good folks at Adafruit (via Pimoroni in the UK)
Features
- Supply voltage range 1.7V to 3.6V
- Operation range 300hPa – 1200hPa
- Sensor’s precision 0.002hPa
- Relative accuracy ±0.06hPa
- Pressure temperature sensitivity of 0.5Pa/K
- Temperature accuracy ±0.5C°
This is the sensor that I bought

Parts List
Here are the parts I used
| Name | Links | |
| Wemos Mini | ||
| DPS310 | ||
| Connecting cables |
Schematic/Connection
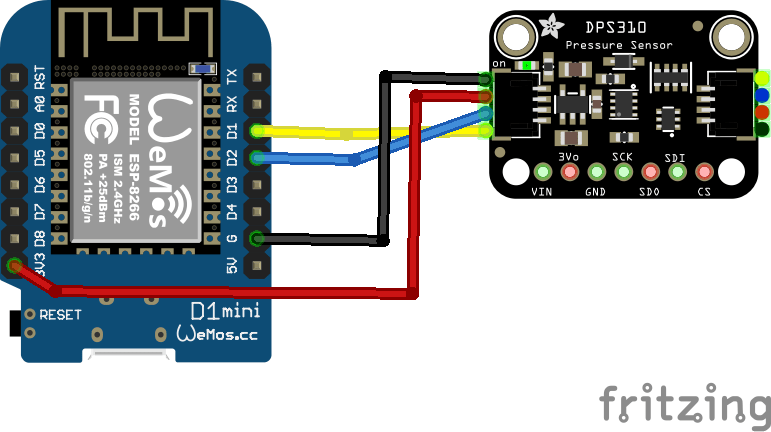
I used the Adafruit DPS310 sensor and in this case used the Stemma connection on the sensor
For the STEMMA QT cables, it uses the Qwiic convention:
Black for GND
Red for V+
Blue for SDA
Yellow for SCL
So color coded for ease of use, this layout shows a connection to the module
Code Example
This uses the library from Adafruit installed using the Library Manager in the Arduino IDE. search for DPS310, and select the Adafruit DPS310 Library and then add the Adafruit BusIO library.
This is the default example
// This example shows how to read temperature/pressure

#include <Adafruit_DPS310.h>

Adafruit_DPS310 dps;

// Can also use SPI!
#define DPS310_CS 10

void setup() {
  Serial.begin(115200);
  while (!Serial) delay(10);

  Serial.println("DPS310");
  if (! dps.begin_I2C()) {             // Can pass in I2C address here
  //if (! dps.begin_SPI(DPS310_CS)) {  // If you want to use SPI
    Serial.println("Failed to find DPS");
    while (1) yield();
  }
  Serial.println("DPS OK!");

  dps.configurePressure(DPS310_64HZ, DPS310_64SAMPLES);
  dps.configureTemperature(DPS310_64HZ, DPS310_64SAMPLES);
}

void loop() {
  sensors_event_t temp_event, pressure_event;

  while (!dps.temperatureAvailable() || !dps.pressureAvailable()) {
    return; // wait until there's something to read
  }

  dps.getEvents(&temp_event, &pressure_event);
  Serial.print(F("Temperature = "));
  Serial.print(temp_event.temperature);
  Serial.println(" *C");

  Serial.print(F("Pressure = "));
  Serial.print(pressure_event.pressure);
  Serial.println(" hPa");

  Serial.println();
}
Output
Open the serial monitor and you should see something like this.
Temperature = 18.43 *C
Pressure = 995.04 hPa
Temperature = 19.46 *C
Pressure = 995.13 hPa
Temperature = 20.64 *C
Pressure = 995.87 hPa
Temperature = 21.77 *C
Pressure = 997.39 hPa
Temperature = 22.72 *C
Pressure = 997.58 hPa
Links

100+ ESP8266 Projects: Guides and Tutorials
https://lededitpro.com/ESP8266-projects